


Foundry is a smart contract development toolchain for Ethereum written in rust.
Foundry simplifies the development and deployment of smart contracts. It streamlines the process by managing dependencies, running tests, and facilitating deployment.
In this article, we will explore the following:
What is Foundry, and why should you use it?
Different tools provided by Foundry for smart contract development
How to get started with Foundry: create, deploy and test smart contracts in Solidity
Let's dive right in!
About Foundry
Foundry is a smart contract development toolchain for Ethereum written in rust.
Foundry manages your dependencies, compiles your project, runs tests, deploys, and lets you interact with the chain from the command-line and via Solidity scripts.
Foundry is created by Paradigm, an investment firm focused on crypto.
Why use Foundry?
You can write tests for your smart contract in Solidity (when using other smart contract development frameworks like Hardhat or Truffle, you would test Solidity using JavaScript or TypeScript). You can read why you should be writing tests in Solidity here.
Foundry has a powerful built-in fuzzing capability. Fuzzing, in essence, is a technique used to find vulnerabilities or bugs in software by providing random, unexpected inputs to the program. Fuzzing lets the Solidity test runner choose the arguments for you randomly, by simply giving arguments to your Solidity test function.
Foundry also provides you with different tools for smart contract development:
Forge: tests, builds, and deploys your smart contracts.
Cast: Foundry's CLI tool for performing Ethereum RPC calls. You can make smart contract calls, send transactions, or retrieve any type of chain data.
Anvil: local testnet node shipped with Foundry. You can use it for testing your contracts from frontends or for interacting over RPC.
Chisel: an advanced Solidity REPL shipped with Foundry. It can be used to quickly test the behaviour of Solidity snippets on a local or forked network.
You can explore more about Foundry toolkit from the Foundry Book and the GitHub repo.
Also, here's a list of Foundry resources including tools, tutorials, libraries & projects using Foundry.
You can read more about the comparison between the Foundry and Hardhat smart contract development toolkit here.
Building, testing and Deploying Smart contracts with Foundry
Installation
On Linux and macOS:
Open your terminal and run the following command:
curl -L https://foundry.paradigm.xyz | bashThis will install Foundryup, then simply follow the instructions on-screen, which will make the
foundryupcommand available in your CLI.Now run the
foundryupcommand in the terminal to install Foundry toolchain:foundryup
On Windows:
If you're on Windows, you will need to install and use Git BASH or WSL, as your terminal, since Foundryup currently does not support Powershell or Cmd.
Initialize the project
To start a new project with Foundry, use forge init:
forge init foundry_project
This will generate a new project folder called foundry_project. The folder will contain the following:
src: default directory for your smart contracts
tests: default directory for tests
foundry.toml: foundry project configuration file
lib: contains the dependencies
script: solidity scripting files
Inside the src folder, you'll find an included sample smart contract named Counter.sol .
// SPDX-License-Identifier: UNLICENSED
pragma solidity ^0.8.13;

contract Counter {
    uint256 public number;

    function setNumber(uint256 newNumber) public {
        number = newNumber;
    }

    function increment() public {
        number++;
    }
}
To compile the smart contract use forge build :
forge build
If your contract compiles successfully, you will see the following output in your terminal:

This will compile the smart contracts in the src folder and also create a new folder named out which will contain the bytecode of the compiled contract.
Testing the contract
Foundry generates a directory named tests , which is the default folder for storing all the tests for smart contracts. The name of the test files has an extension of .t.sol
If you navigate into the test folder, you'll come across a specifically named test file called Counter.t.sol .
// SPDX-License-Identifier: UNLICENSED
pragma solidity ^0.8.13;

import "forge-std/Test.sol";
import "../src/Counter.sol";

contract CounterTest is Test {
    Counter public counter;

    function setUp() public {
        counter = new Counter();
        counter.setNumber(0);
    }

    function testIncrement() public {
        counter.increment();
        assertEq(counter.number(), 1);
    }

    function testSetNumber(uint256 x) public {
        counter.setNumber(x);
        assertEq(counter.number(), x);
    }
}
To run this file to test the Couter.sol smart contract use forge test :
forge test
If all the test passes then you will see the following output in your terminal:

You can also see the gas cost being printed for the functions in the test contract.
On the other hand if some tests fail, this will be the output.
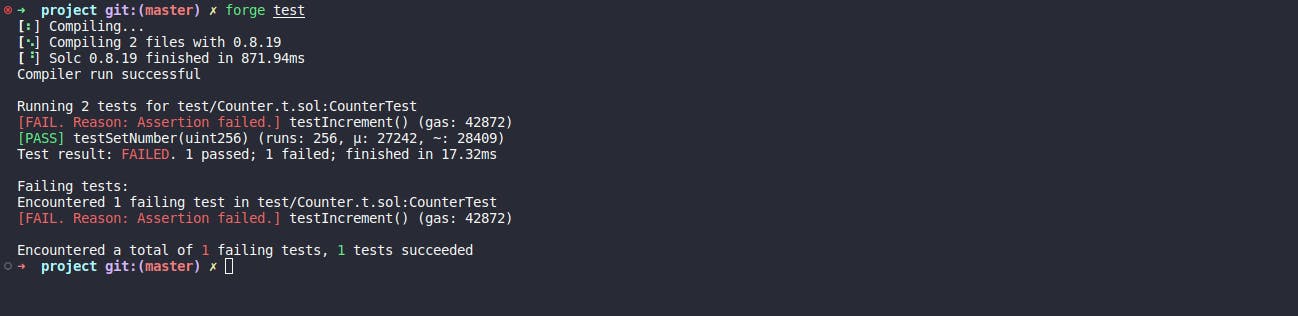
You can replicate this by make some changes in the Counter.sol smart contract(I've changed the increment function so that it increments the number by 2 instead of 1).
function increment() public {
    number += 2;
}
Deploying the smart contract
To deploy the smart contract tot a network use forge create command:
forge create --rpc-url <your_rpc_endpoint> --private-key <wallet_private_key> src/Counter.sol:Counter
You can get the RPC for the network from Alchemy by following this guide.
If the smart contract is deployed successfully you will see the following output in your terminal:

Writing tests for smart contract
Now let's add some of our own functions and tests to the existing Counter.sol smart contract.
// SPDX-License-Identifier: UNLICENSED
pragma solidity ^0.8.13;

contract Counter {
    uint256 public number;
    uint256 public myNumber = 42;

    function setNumber(uint256 newNumber) public {
        number = newNumber;
    }

    function increment() public {
        number++;
    }

    function decrement() public {
        myNumber--;
    }
}
In the above smart contract we have added variable myNumber which has a value of 42 and the function decrement() which decrements the value of myNumber by 1.
To test these functions we need to add some functions in the Counter.t.sol test file.
// SPDX-License-Identifier: UNLICENSED
pragma solidity ^0.8.13;

import "forge-std/Test.sol";
import "../src/Counter.sol";

contract CounterTest is Test {
    Counter public counter;

    function setUp() public {
        counter = new Counter();
        counter.setNumber(0);
    }

    function testIncrement() public {
        counter.increment();
        assertEq(counter.number(), 1);
    }

    function testSetNumber(uint256 x) public {
        counter.setNumber(x);
        assertEq(counter.number(), x);
    }

    function testMyNumber() public {
        assertEq(counter.myNumber(), 42);
    }

    function testDecrement() public {
        counter.decrement();
        assertEq(counter.myNumber(), 41);
    }
}
In the above test file we have added test functions testMyNumber() and testDecrement() . The testMyNumber() function checks the assigned value of myNumber and testDecrement() function checks the working of the decrement function. Both of these functions use assertEq to equate the value assigned to myNumber .
Now let's run these new tests with the forge test command:
forge test
If all the test passes you will get the following output in your terminal:

As you can see all the test passed, and we also got the amount of gas used to run each test function.
Using libraries
The libraries that you install will go in the lib folder , of your project by default, ds-test is installed, this one allows you to run tests, create asserts or logs. If you want to install other libraries(e.g. openzeppelin) you can run:
forge install openzeppelin/openzeppelin-contracts
This will add the openzeppelin repository in your project under the lib/openzeppelin-contracts folder. Now you can import and use the openzeppelin smart contracts in your project.
Next Steps
With this we have learned the most basic applications of the foundry toolkit. Further we will learn how to develop, test and deploy more complex contracts like ERC20, ERC721 tokens, DEXs and many more using foundry.
Hope you enjoyed the article! If you have any questions or comments, feel free to drop them below or reach out to me on